How to print Grubhub orders

To help you get started with printing orders you receive from Grubhub we’ve put together this short guide that covers the types of Grubhub for Restuarant supported printers, how to set up printers, and how to printer Grubhub orders you receive through email or fax. If you need additional assistance, please log in to your Grubhub for Restaurants account to navigate to the Help tab within the portal.
A choice of 3 connection interfaces:
- LAN Ethernet RJ45
- WiFi WPS
- WiFi AP
- Bluetooth (Android only)
- Connect the Grubhub tablet to the printer
If you have a Grubhub-provided tablet, you can set up automatic printing with the one of the Star Micronics models below:
Compatible printers
If you have a tablet provided by Grubhub, you can set up automatic printing with one of the Expedy models below:
Expedy XPDY80EWBG , Expedy XPDY80EWBG-UK, Expedy XPDY80EWBG-US
How to connect the printer to a wired LAN
- Branchez l’imprimante directement sur le internet router using an Ethernet RJ45 network cable.
- Connect the Grubhub-provided tablet to the same network.
- Select the drop-down menu.
- Go to Settings.
- Select Add Printer.
- To print receipts automatically, select Yesunder Automatic Receipt Printing and select the number of copies to print.
How to connect the printer via WiFi WPS
Step 1: To connect the printer to the network, press the WPS button in the LCD menu “.Start WiFi WPS”
Step 2: Press the WPS button on the access point or router.

Note: The procedure for using the access point or router varies depending on the device. When configuring, be sure to refer to the corresponding device documentation.
Step 3: When a network connection is established, the printer light stops blinking and stays solid green. On the printer’s LCD screen the network IP address is displayed and “server connected”.
Note: If the connection cannot be established, try to reconnect from the beginning of step 1.
How to connect the printer to WiFi manually (Direct WiFi AP)
Step1: Connect your cell phone or computer to the printer hotspot
- Go to WiFi Settings,
- Find DIRECT-XXX network, default password is 88888888
- After successful connection, if the phone says you cannot access the Internet, you can ignore it.
If you are asked to maintain or log out, select maintain and do not log out.
Step2: Access the printer’s WiFi configuration page
Scan the QR code below with your phone or manually enter http://192.168.223.1 into the phone’s browser address bar to access the WiFi configuration page.
Enter your WiFi access information, the SSID corresponds to the name of the WiFi network (respect uppercase, lowercase, hyphens, underscores).

How to connect the printer via Bluetooth
Android only
Step 1: Tap Settings on your tablet’s home screen and select Bluetooth.
Step 2: Turn on Bluetooth.

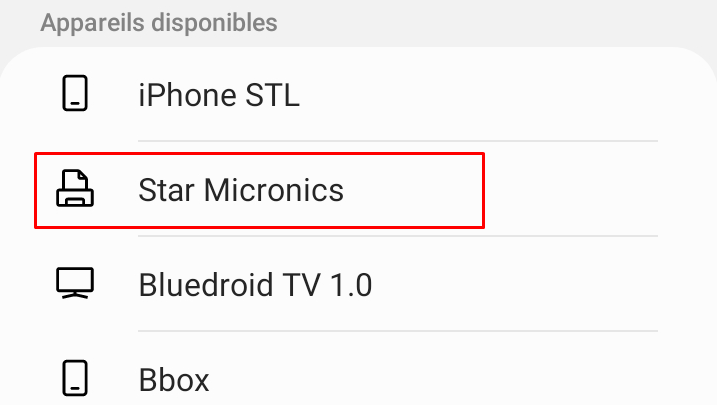
Step 3: Search for “Star Micronics” in the list of available devices

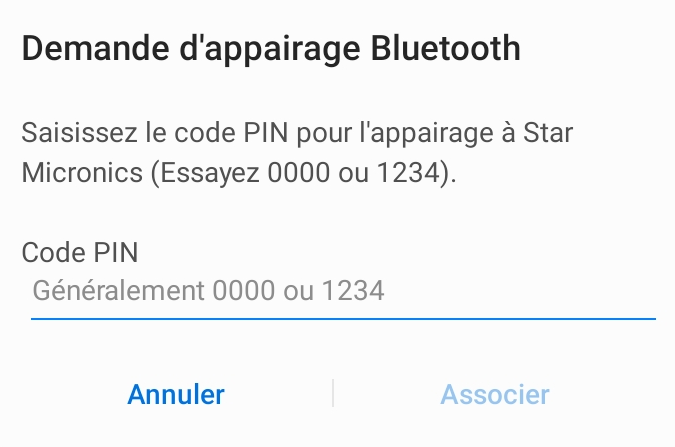
Step 4: Confirm the Bluetooth pairing request by typing the password 0000 (zero zero zero zero)

Step 5: Tap PAIR
The tablet is now connected to the printer.

Connect Grubhub tablet to printer
Step 1: Make sure you’re signed in to your Grubhub for Restaurants account, then tap the icon in the upper left corner to get started.

Step 2: Tap Settings from the drop-down menu.

Step 3: Press the add printer button.

Step 4: After pressing the “Add Printer” button, the button changes to “Select Printer” and a radio button with the The printer’s model number appears above.
Step 5: Select the printer, and the printer will be added.

Step 6: A three-dot menu appears with the options Test Printer or Disconnect Printer.
Step 7: If no printer is found, an error message is displayed.

If you have any questions about configuring your printer, you can contact the Restaurant Care team at 877-799-0790 (English/Spanish support) specifying that you are using a printer model reference TSP100SERIES.